Rear subframe rusted out on 2011 QX56, sway bar detached

CueExFiftySix

New member
Joined
Jan 24, 2013
Messages
24
Reaction score
2
Points
3
Hi friends, just had my trusty 2011 QX56 with 175k miles on it in the shop to get front complete strut assemblies replaced on both sides. When they went to do the alignment afterwards, they discovered bad rust on the left rear subframe and the sway bar bolt almost completely detached from the subframe. Pic is attached below. This shop (not dealership) doesn't do that kind of work and doesn't want to try and fix that. Wondering what my options are here. Do you think a welding shop could patch this up? If not, is it time to scrap this vehicle? I love the vehicle and it still runs very nice (although transmission is a little worn) and overall is in nice shape and still looks good. But I'm guessing replacing the subframe would be very expensive, likely more than the vehicle is worth?

Would love to get some opinions on how to proceed with this, as I am not sure what to do.

Thank you.
 

Attachments

  • IMG_8030001.webp
    IMG_8030001.webp
    242.8 KB · Views: 6
No experienced and trusted welder will tell you that can be fixed. If you plan on keeping the truck longer, then replacing the rear subframe on your Z62 is your only option. By doing so, it’d be best to replace all the upper and lower control arms, coil spring buckets and hardware as well.
 
Thank you for your reply, primov8. I assumed it was beyond welding, but I don't really know much about welding and thought perhaps it was possible to add in enough surrounding metal to repair it.

Now I've got to figure out prices for all the parts and labor. No way I am taking this to a dealership, I can't even begin to imagine what they would charge for it.
 
The hard part is finding a reputable & experienced independent repair shop. Unfortunately labor costs is what will make this repair pricey but it really doesn't require special skills in diagnostics. It's laborious because it requires removal of all the suspension components, brake components, rear driveshaft, axles and rear diff. But at the end of the day, it's literally a bolt-off or in your case, cut off and bolt-on type of repair. I DIY'd a similar repair back when I had my 04 armada many years ago. The alignment tabs on the rear subframe had rotted out along with seized hardware throughout due to Northeast winters.

Fast forward to 2023 and now living in Texas, I had to tackle a similar repair on my QX80. Since it spent nearly all its life in the Northeast, all the alignment hardware had seized in the control arm bushings and I couldn't get my truck aligned within spec. Thankfully I didn't have to remove or replace the rear subframe but I went ahead and replaced the control arms, axles, wheel hub assemblies, rear spindles (ball joints stud were completely seized), coil buckets, coil springs, suspension and alignment hardware. I should have the list and what the parts costs so I'll see what I can find and post it later.

Search ebay for the rear subframe as it'll cost much less than buying from Nissan.
______________________________
 
Very cool that you did it yourself. I'm no mechanic but I own tools and work on my own stuff from time to time, usually by finding a youtube video tutorial or a mechanical guide. I may actually attempt this repair myself, not sure yet. I did find another forum post by someone who did similar to this on his 2011 QX56 and he listed his steps as this:

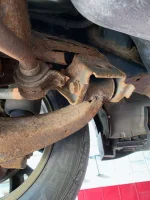
The solution: I found a 2012 complete rear suspension assembly in FL and had it shipped to my house on a lift gate truck for $1800 total. Barely any rust in or out. It did not have HBMC though.

I put my QX on 12 ton/pair jack stands, removed the wheels, and went at the tearing it down. While I can get more specific on the steps if asked, below is the high level:

Disconnect the emergency brake lines in the middle of the truck where the left and right slide into the single cable bracket.

Unbolt the emergency brake lines from the body bottom.

Unbolt the drive shaft from the rear diff shaft

Unbolt the rear brake calipers and hang them off to the side.

Lower the spare tire and remove it. tie up the chain out of the way

Disconnect wiring harness from the air ride sensor (driver's side spring bucket/control arm), HBMC sensor (passenger side spring bucket/control arm), wheel speed sensors (both sides), and all along the subframe. move it out of the way

Cut (easiest) the upper control arms' (both sides) forward -position "leg" connected to the subframe. Unbolt and remove (leaving the rest of the upper control arm there).
* This will allow removal of the rear suspension assembly without disconnecting the HBMC hydraulic lines to the shocks.

Unbolt the HBMC hydraulic lines' brackets (both sides) from the subframe. Doing this from the top of the subframe while sitting up where the spare tire was is easiest.

Unbolt the shocks (both sides) from the lower-front control arms.
* This will obviously allow removal of the rear suspension assembly without disconnecting the HBMC shocks

Place and raise a floor jack to support the rear diff.

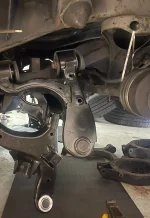
Unbolt the subframe (3 bolts on each side) from front to rear. The rear locating pins should keep it in place.

Lower the assembly to the floor

Drag it out from under the truck

Before jacking the newer rear suspension assembly up to bolt it to the subframe, remove both upper control arms by unbolting them from the subframe and pulling them (ball joints) out of the drive hub knuckles.

Since the assembly I got didn't have HBMC, I had to also remove the rear sway bar, end links, and mounts. no biggie.

Reassemble pretty much in reverse only leave connecting the upper control arms to last. You'll need to tilt and jigger the control arms around the HBMC shocks' hydraulic lines and then bolt them up.

To get HBMC to work, move the height sensor, brackets and linkage from the passenger side of the old rear suspension and bolt them up to the replacement.

A side benefit of installing the upper control arms last is you'll reverse the front top bolts so the nut is forward between the frame and subframe where before, you could never replace those arms without partially dropping the subframe to get the bolt out. Stupid design.

This is also a great time to replace the brakes and change the rear diff gear oil. Rechecking all of the bolt torques is also suggested. you never know what the replacement assembly had done to it before.

When all done, take it for a 4-wheel alignment and pray that the alignment bolts are not also seized in the bushings else you'll have to cut those out and replace the entire control arm(s) as the alignment bushings are not serviceable. According to the Infiniti service department, this is very common even with newer vehicles with only 10-12k miles on them (when run in the salt belt states).
 
Also, sorry for the very stupid question, but is the severely rusted and crumbling part in my pic the subframe (crossmember) or is that one of the control arms?
 
Also, sorry for the very stupid question, but is the severely rusted and crumbling part in my pic the subframe (crossmember) or is that one of the control arms?
Some parts listing and some savings. Luckily, I was able to source of all these from Amazon.
- Rear UCAs. Dorman 527-192 & 527-193
- Rear coil buckets. Dorman 522-005 x (2). It lists for the first gen trucks but it's still the same coil buckets used from 04-24.
- Rear TOE alignment hardware. Febest cam bolt 0229-008 x (2). Febest centric disc 0230-008 x (2) *These bolts & discs are installed where the coil buckets bolt onto the rear subframe*
-Rear CAMBER alignment hardware. Febest can bolt 0229-007 x (2). Febest centric disc 0230-008 x (2) *These bolts & discs are installed on the LCA, forward side, which also bolts onto the rear subframe.
Unfortunately, the LCAs are only available from Nissan OEM.


The LCA mount is part of the rear subframe, along with the rusted off sway bar bracket which also bolts onto the rear subframe.
I'll have to look thru my misc parts bin tomorrow but it's possible I still might have the rear OE sway bar brackets and bushings. I had upgraded the rear sway bar to a Hellwig sway bar so if I find the OE pieces, I'll pass them onto you.

For reference, here's a pic of the UCAs and LCAs, temporarily bolted onto their corresponding mounts when I was working on my QX80. Those mounts are welded and part of the rear subframe.
 

Attachments

  • IMG_2213.webp
    IMG_2213.webp
    56.5 KB · Views: 3
Last edited:
Wow, this is awesome help primov8, thanks a ton! So I am assuming at a minimum in addition to your parts list above I will need a new rear crossmember subframe?

This is going to be an expensive repair... lol
______________________________
 
Wow, this is awesome help primov8, thanks a ton! So I am assuming at a minimum in addition to your parts list above I will need a new rear crossmember subframe?

This is going to be an expensive repair... lol
That rear subframe needs to go.
It most definitely can be expensive especially if you’ll have a shop do the work. But like what I’ve told others before when I did the rear subframe repair on my 04 and the rear suspension re-fresh on the QX80 back in 23’… it’s literally all nuts and bolts. Of course, still a daunting task because of the size, weight and amount of components that need to be removed. But still DIY’able with a couple 6 ton jack stands, floor jack(s) and tools.
 
Nuts and bolts I can do. As long as no welding or super specialty tools I bet I can do this. Over the next couple days I'm going to put together the list of every part I think I'll need plus the price I can find and total it up. I'll post it all here and see what you guys think. Thanks for all the help!
 
Would this be the subframe that I need?
 
Back
Top